
With the arrival of baby #3 and moving the big girls into one room – maximizing the space in their little closet quickly moved to the top of our project list.


I had seen a few similar closet makeovers on Pinterest and knew that the Ikea Pax Wardrobe System was the answer to our small closet problems!
Materials and Project Cost:
- Ikea Pax Wardrobe: $80
- Komplement Drawers: $25 ea (used 4) – $100
- Komplement Shelves: $10 (used 7) – $70
- Wood Clothing Rods: $10 for 8ft (we reused the existing one to cut in two for one side, and bought one more for the other side) – $10
- Wallpaper – we had leftover wallpaper from our 1/2 bath project to install on the inside of the Pax unit
Tools Needed:
- Table Saw
- Power drill
- Screws
- Multi-tool (to cut baseboard)
- Optional – wallpaper tools – wallpaper smoother, water mist/bottle, large sponge, *sharp* utility knife
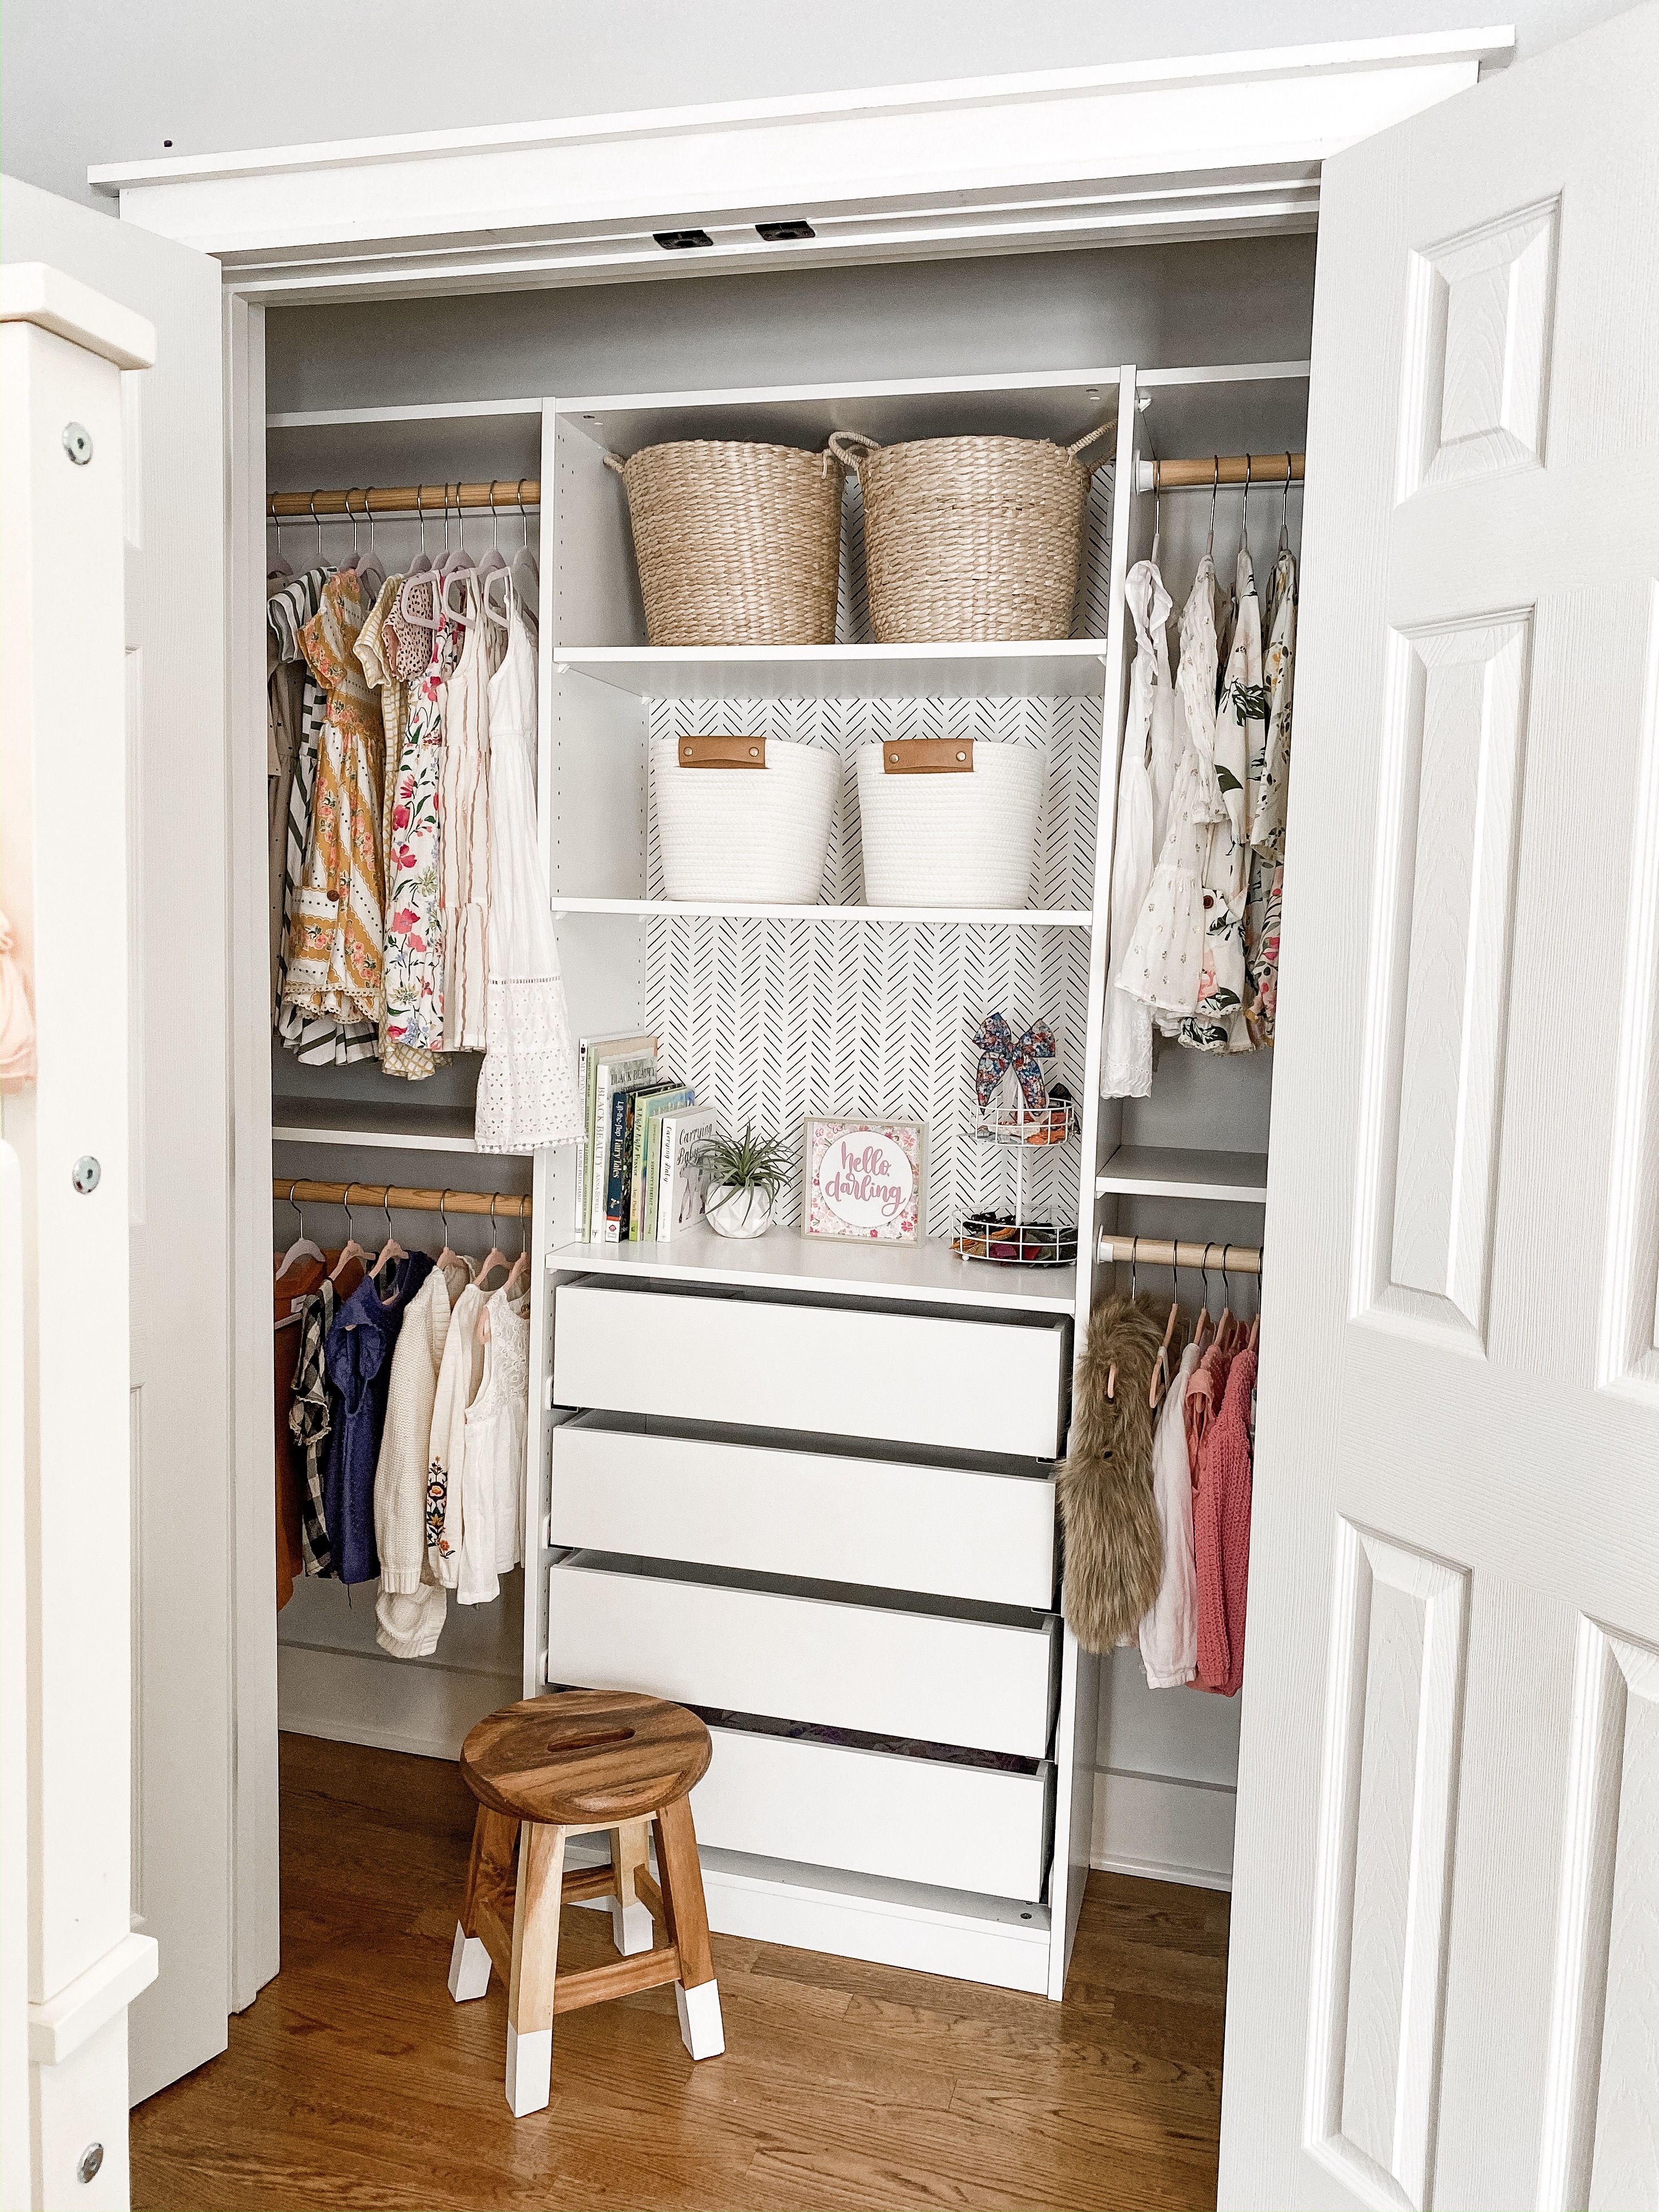
Ikea Pax Closet Makeover
The goal was to maximize the space in a budget friendly way, while also keeping it functional for my 6 year old and 3 year old.
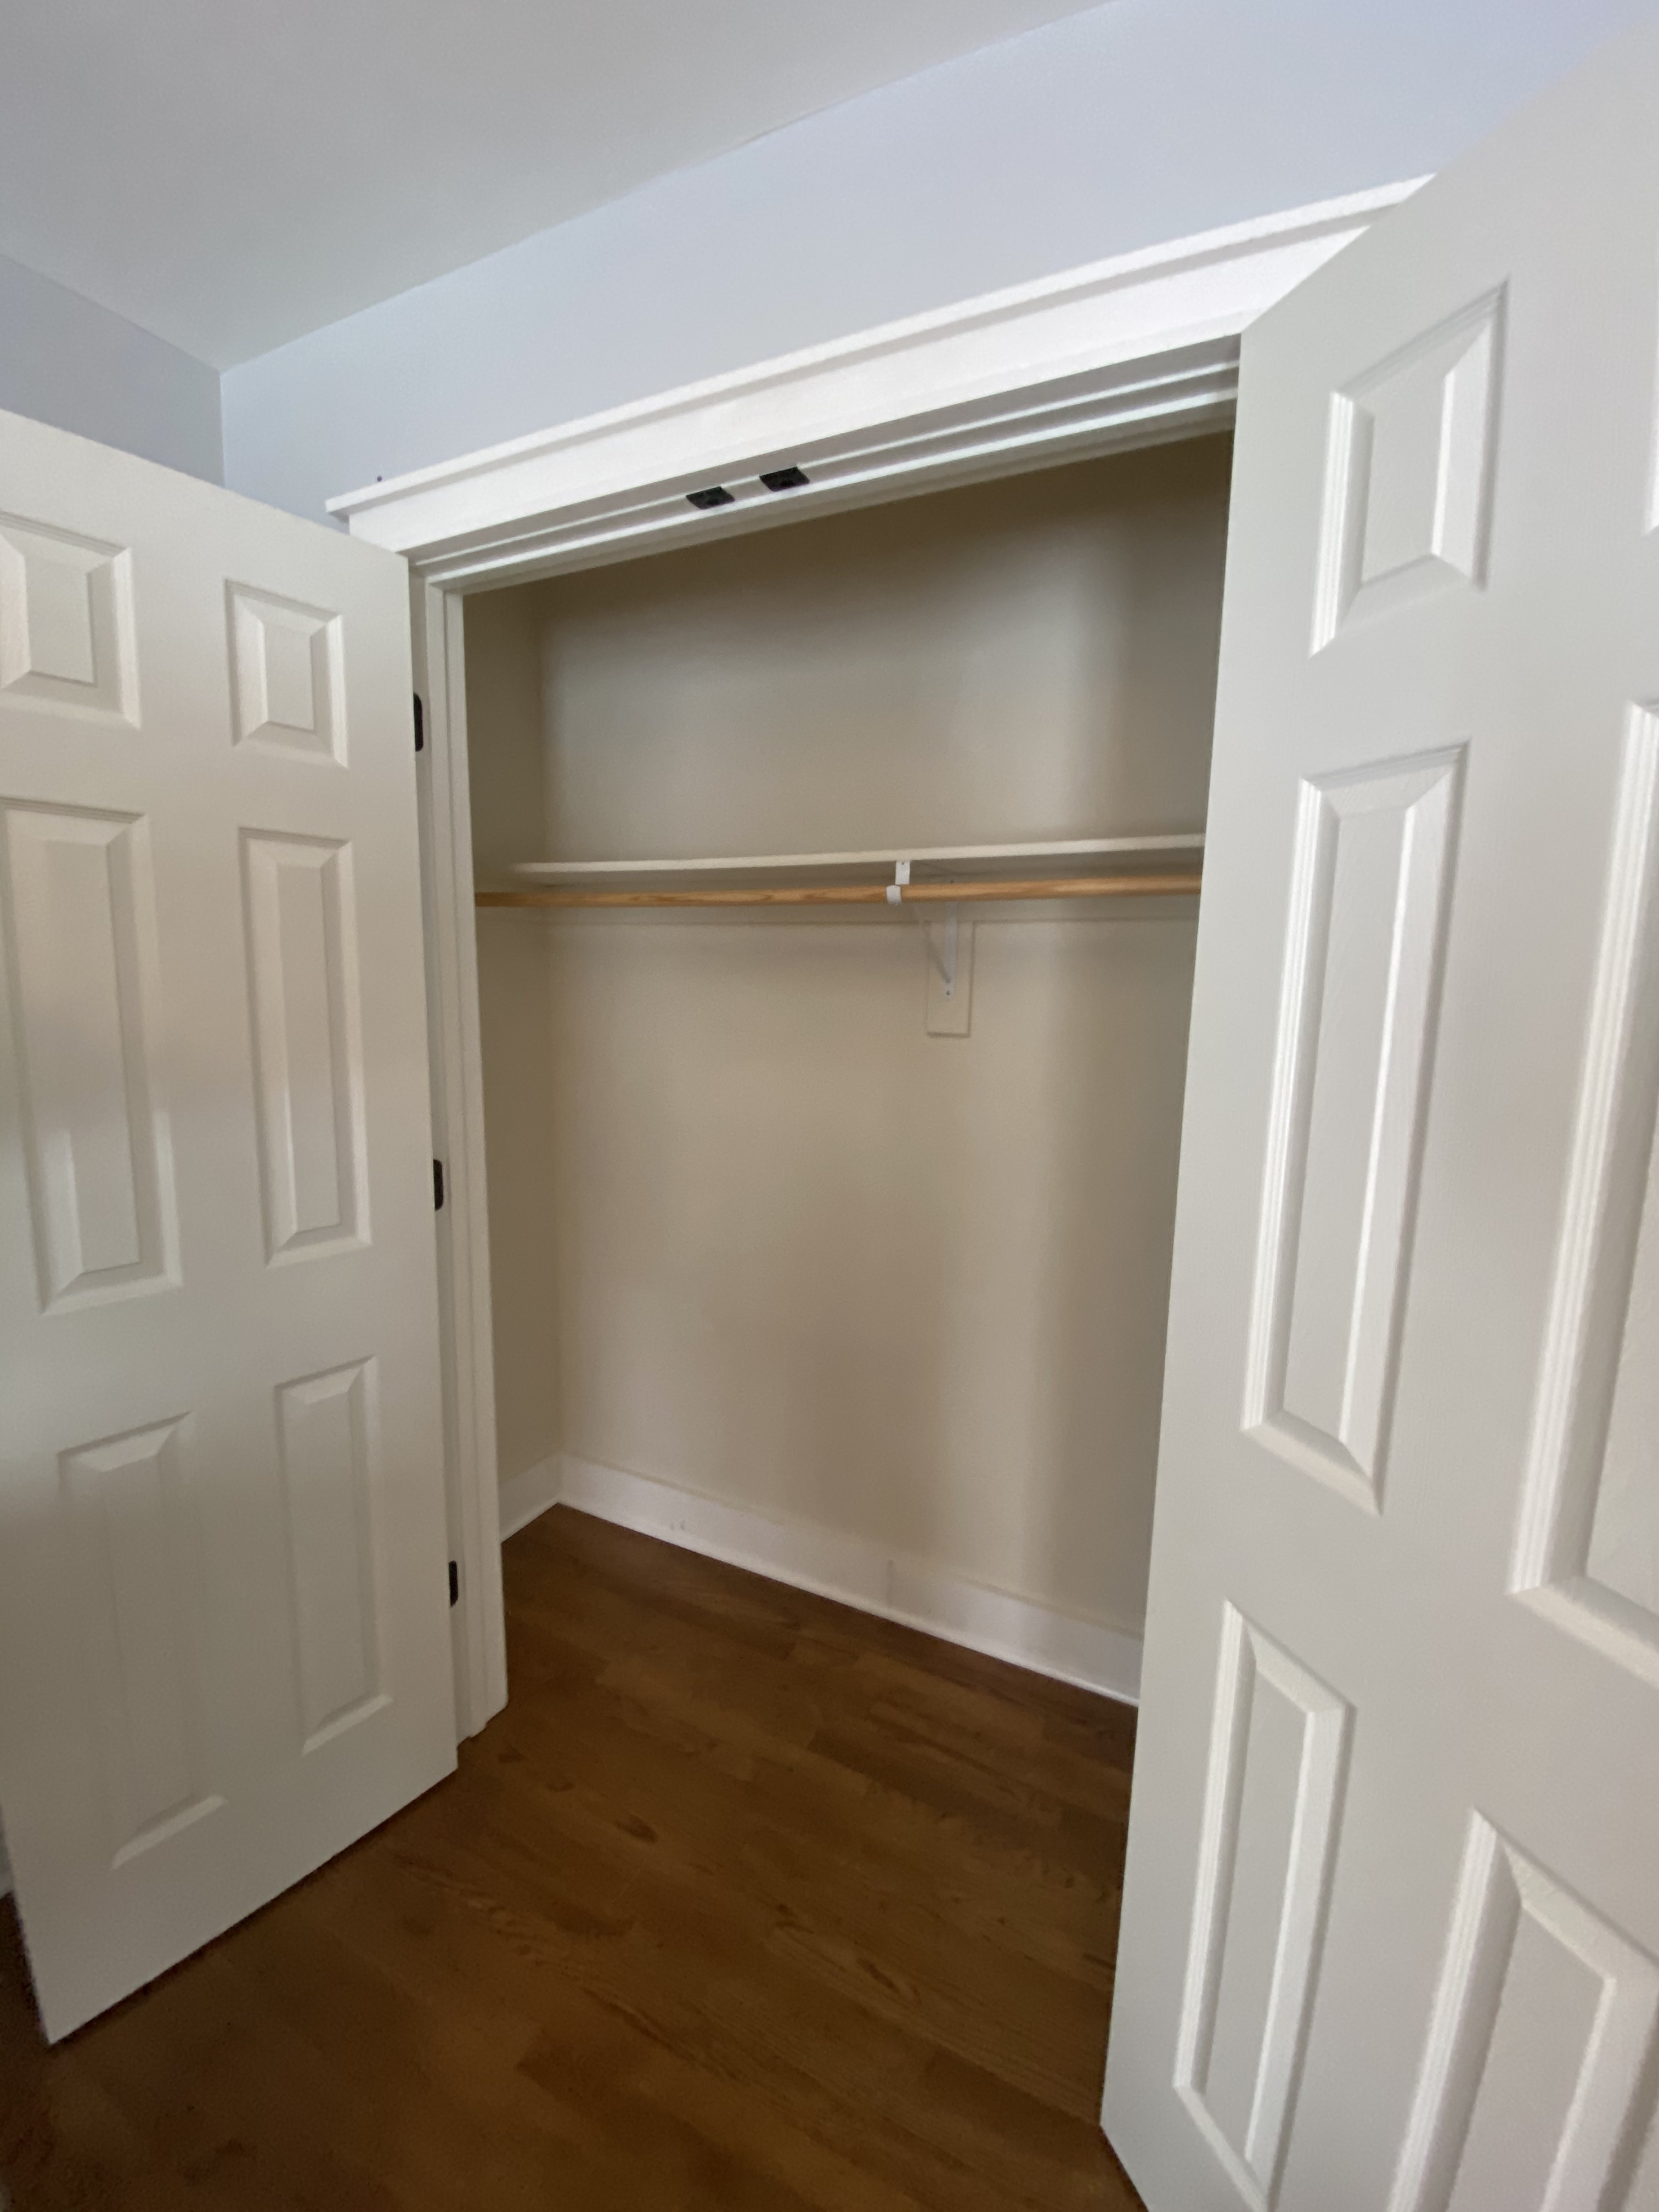
We first removed the existing shelf, patched the holes and primed/painted the closet. My plan was to wallpaper the entire inside of the closet, but decided on keeping it simple. So we kept the closet a bright white to match the Pax unit and make it look a little more “built in”.
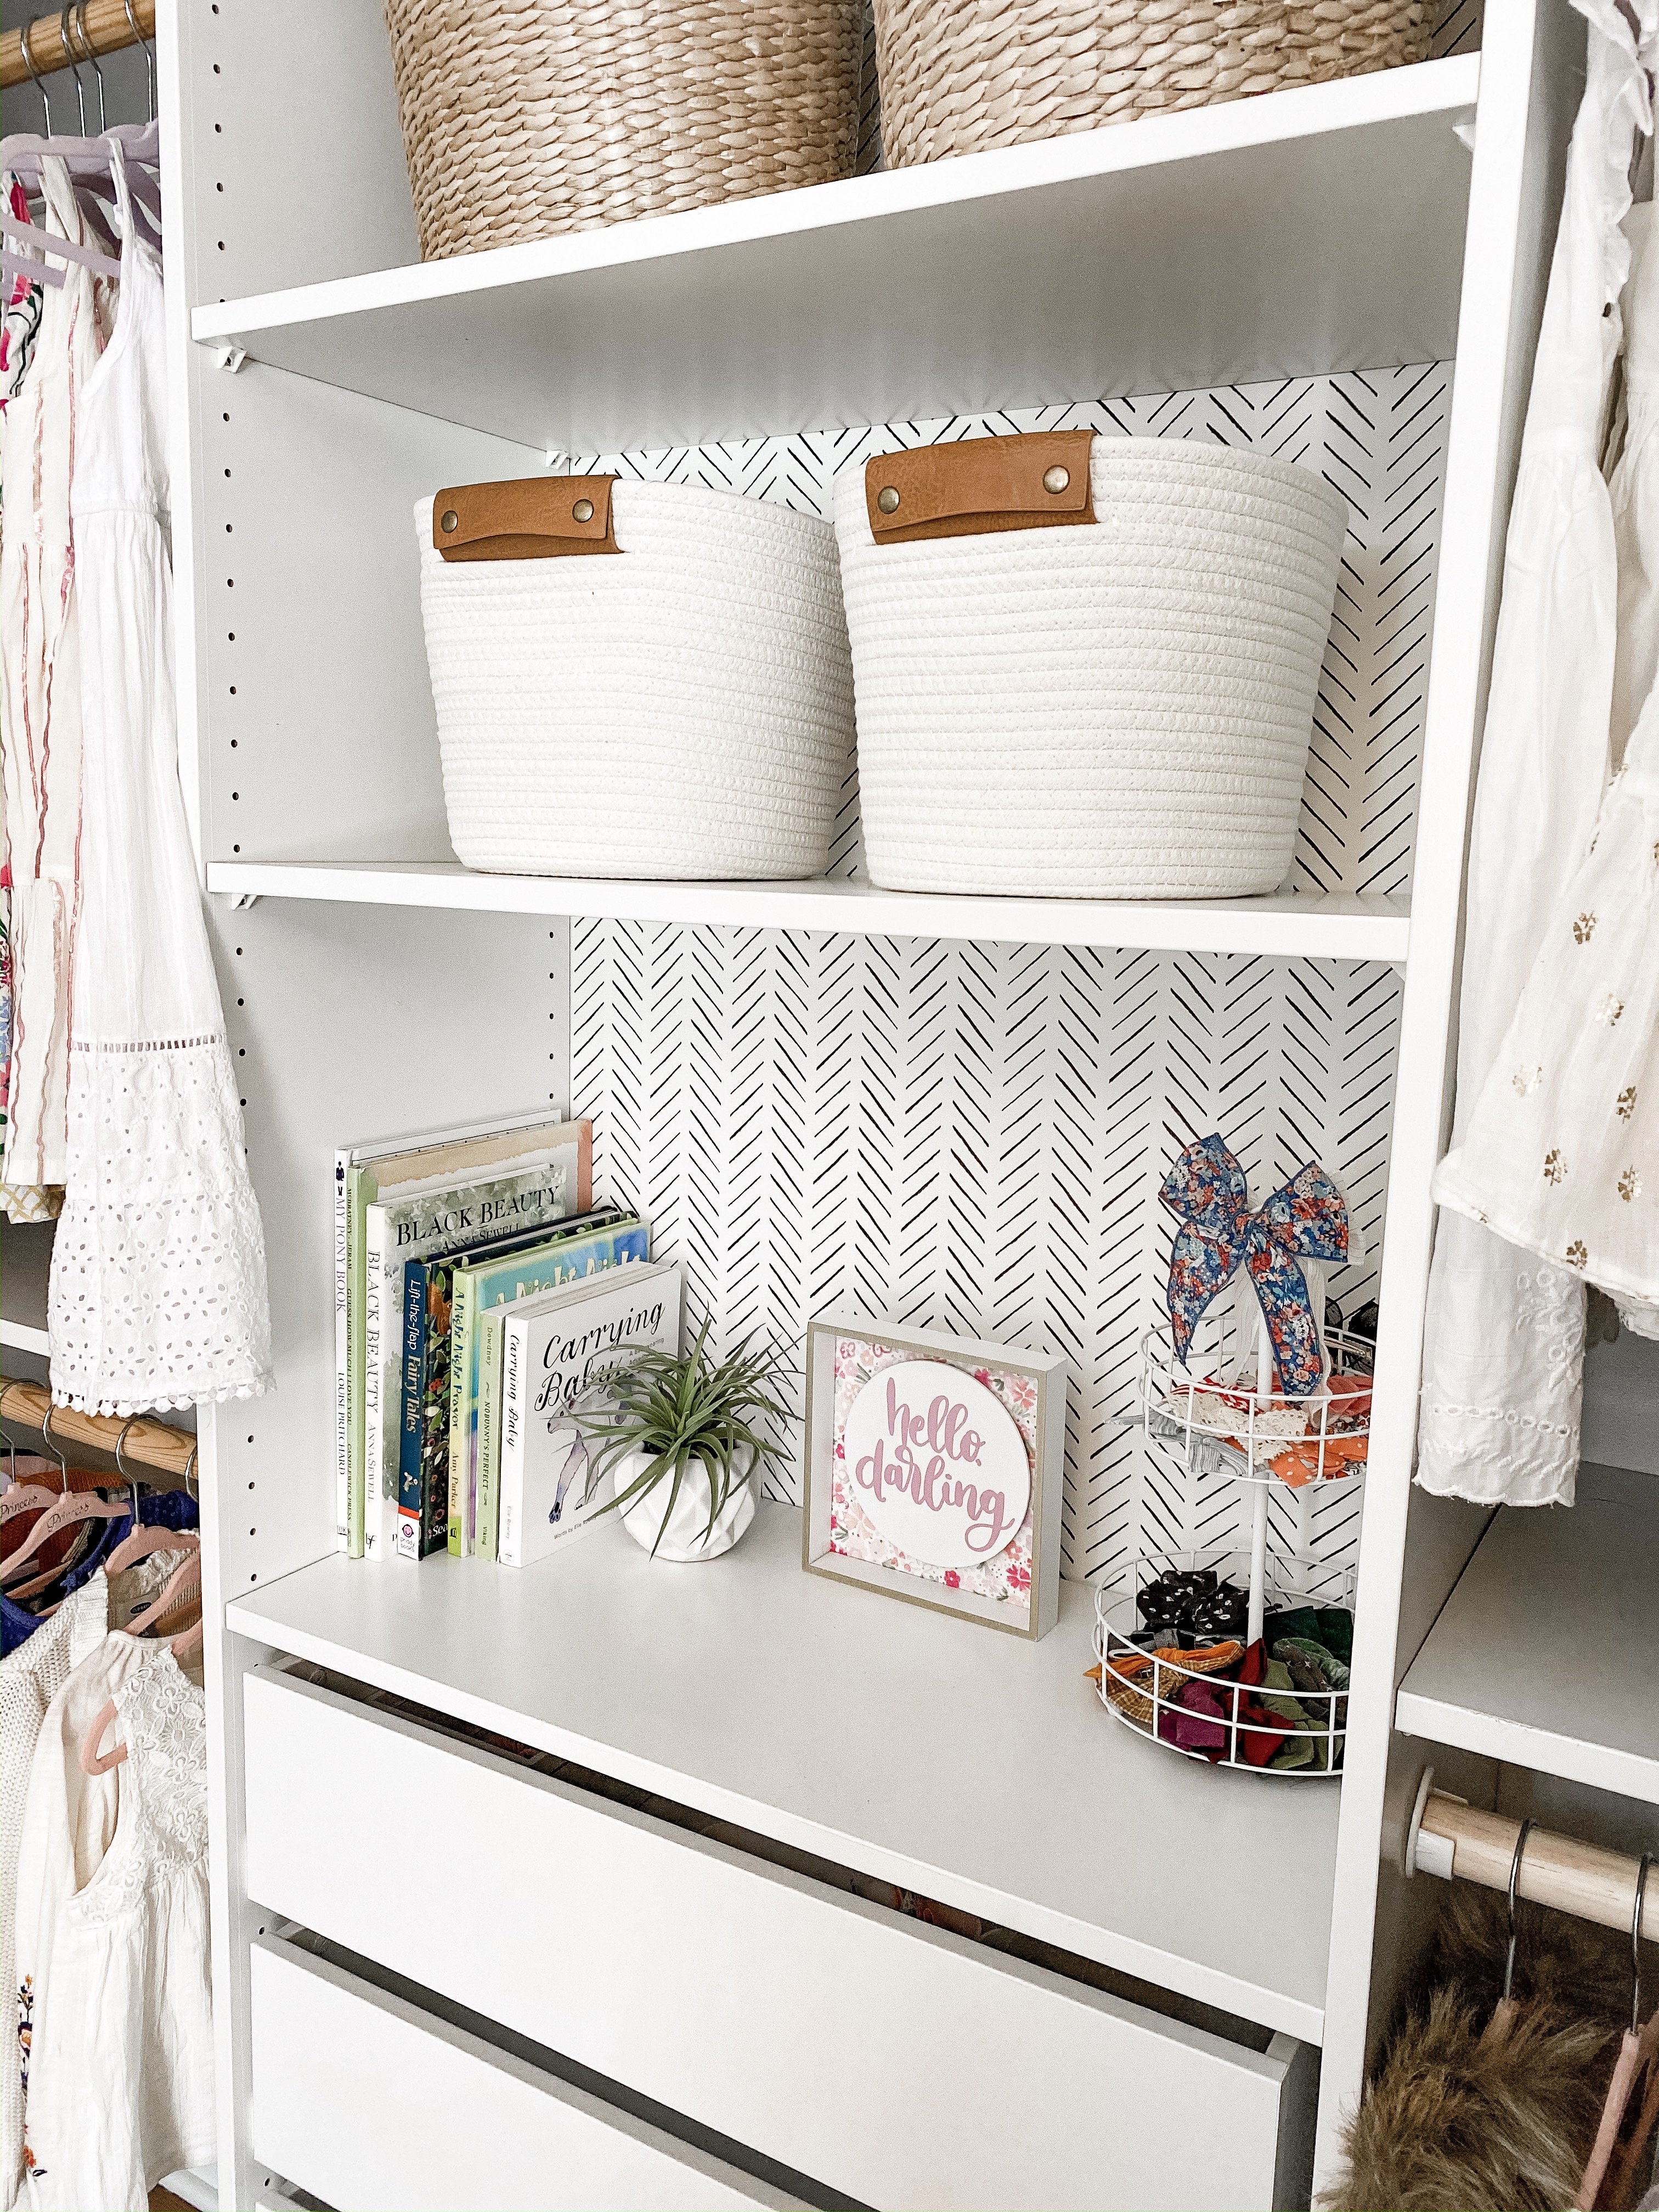
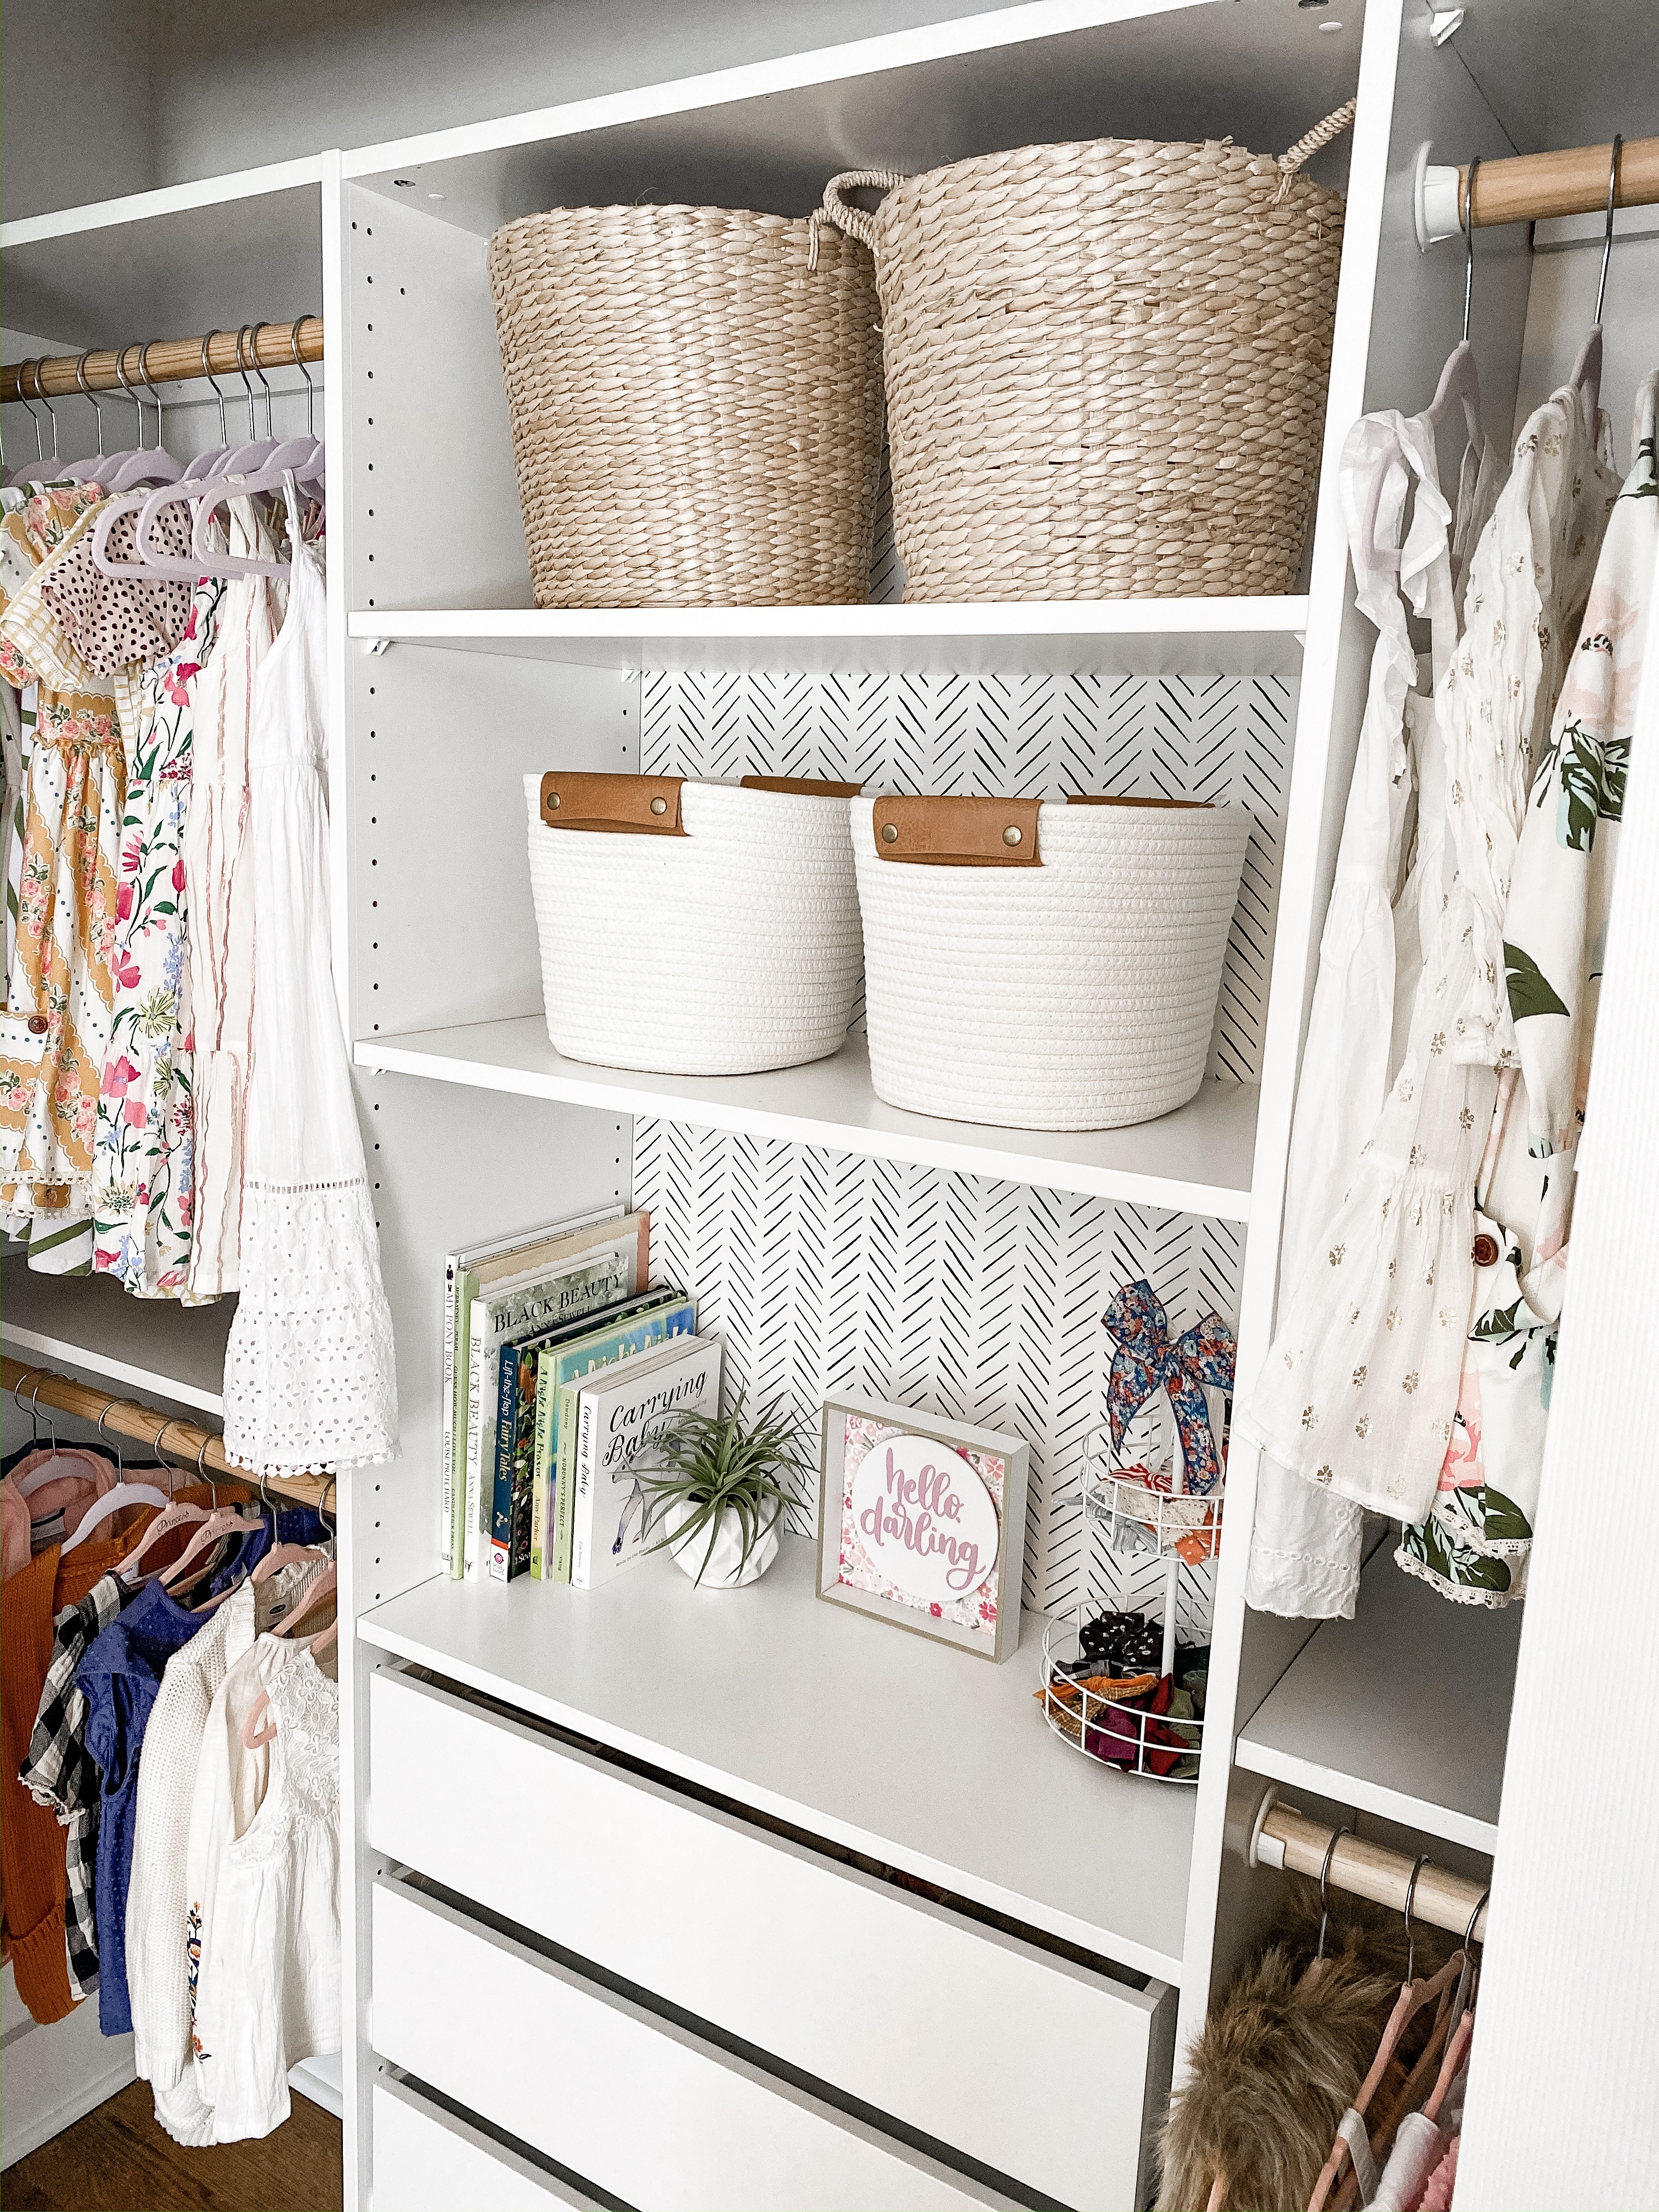
We chose the 14″ deep x 29″ wide pax wardrobe as it was the best fit for our closet. Once we assembled the wardrobe, I installed the extra Magnolia wallpaper we had on hand from our 1/2 bath project on the interior. I am so happy we did that! The little pop of pattern is so fun!
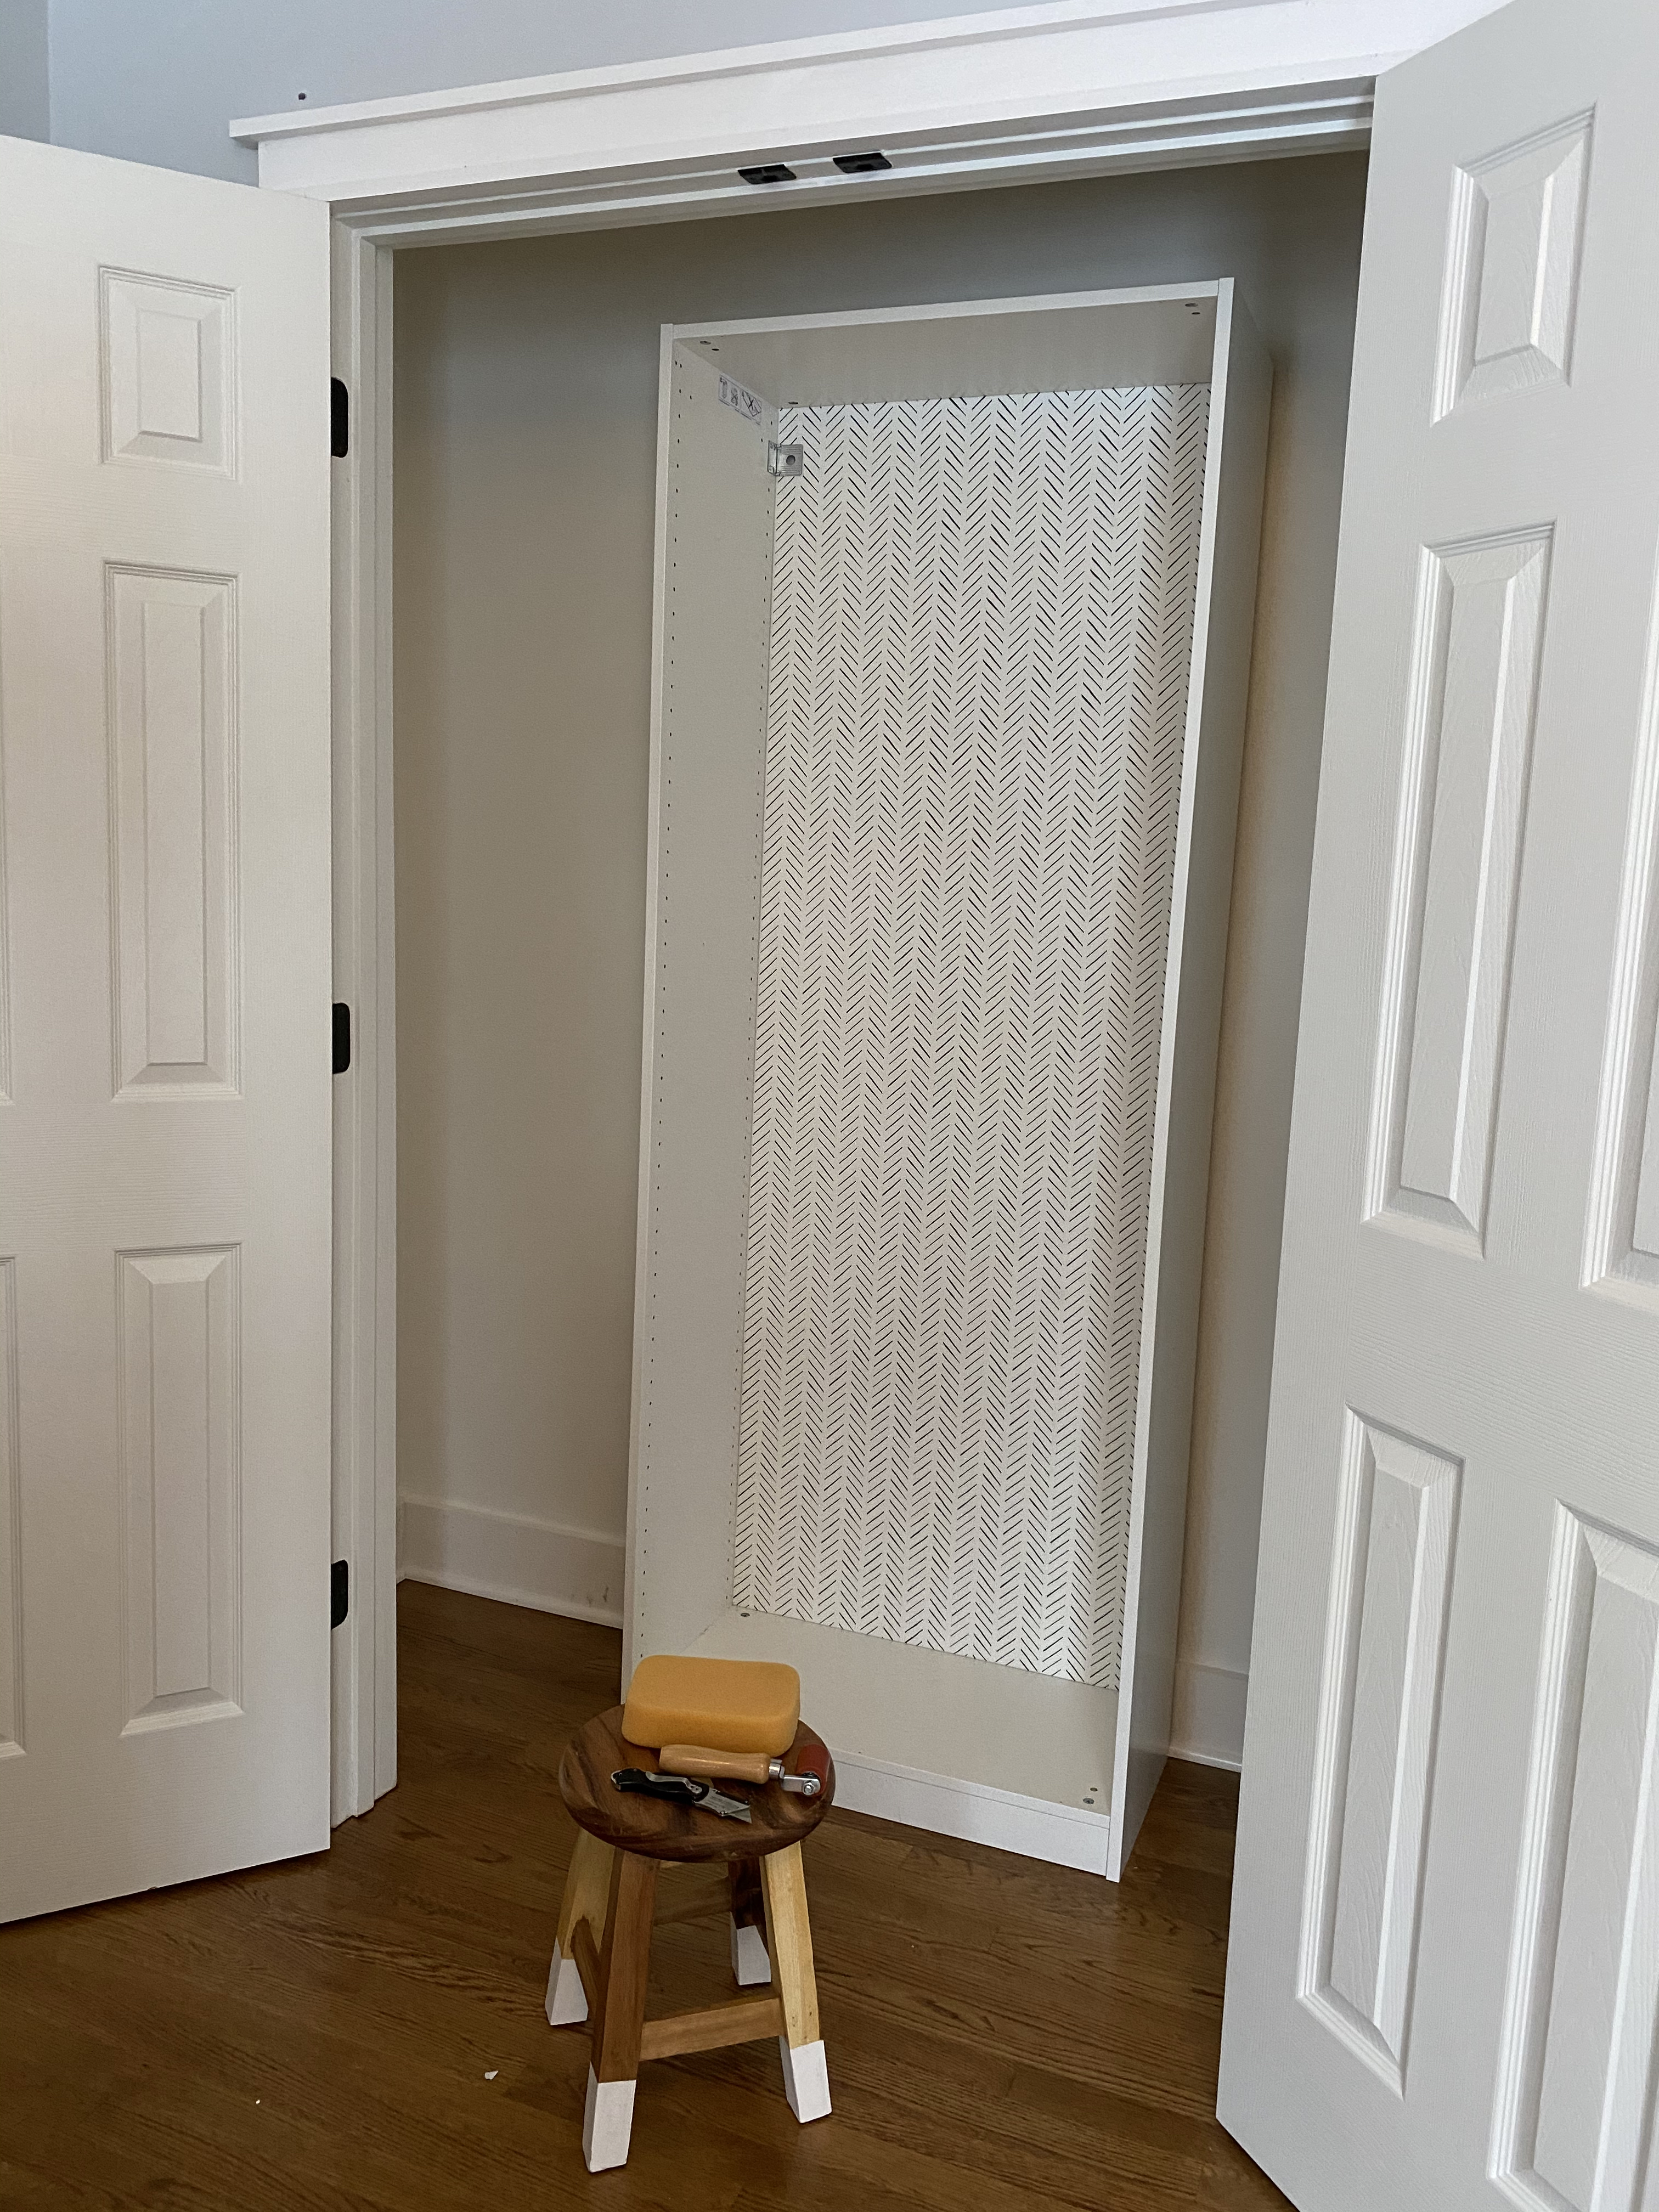
Once that was done, we slid the wardrobe back and used a multi tool to custom cut the baseboards enabling us to push the wardrobe flush against the wall. Measuring from both sides to make sure it was dead center, we were able to get a super tight fit and after a little caulk to hide the seam, it looks amazing!
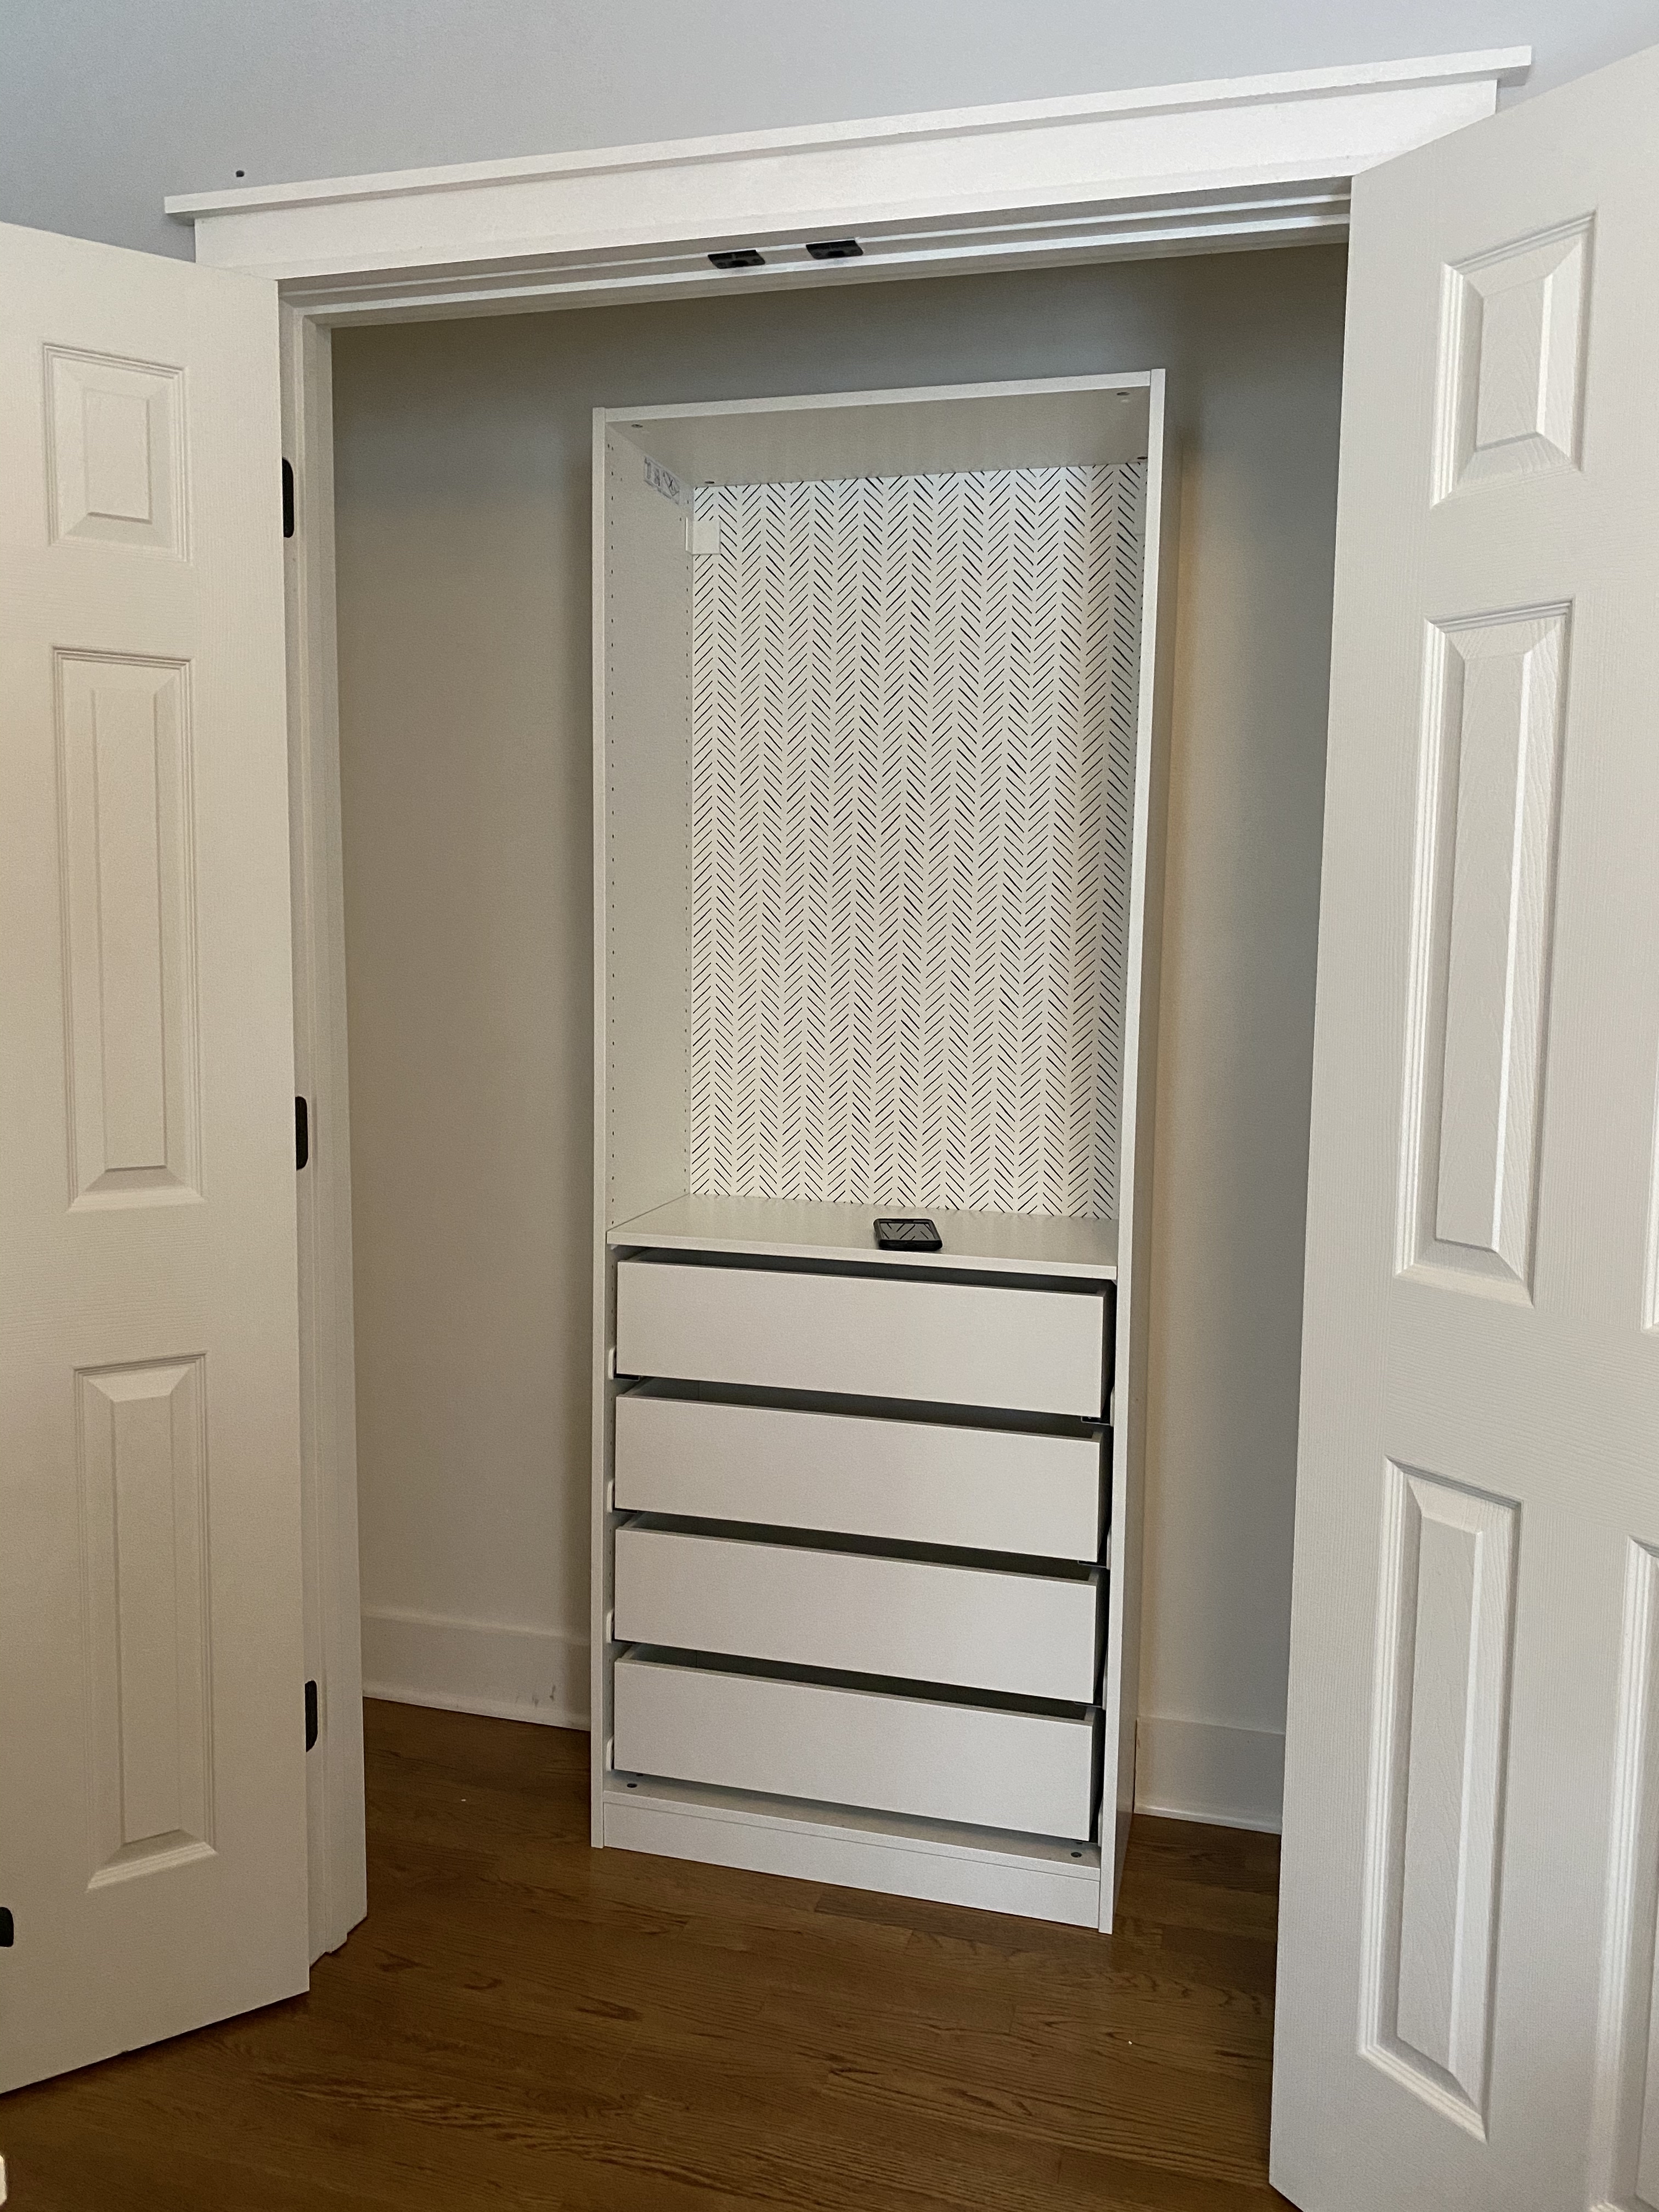
After securing the wardrobe to the wall, we installed the drawers and shelves. We did 4 drawers (2 for each kid) but the pax wardrobe system has so many different options and configurations. *NOTE: I am waiting on my brass cup pulls for the drawers to arrive.
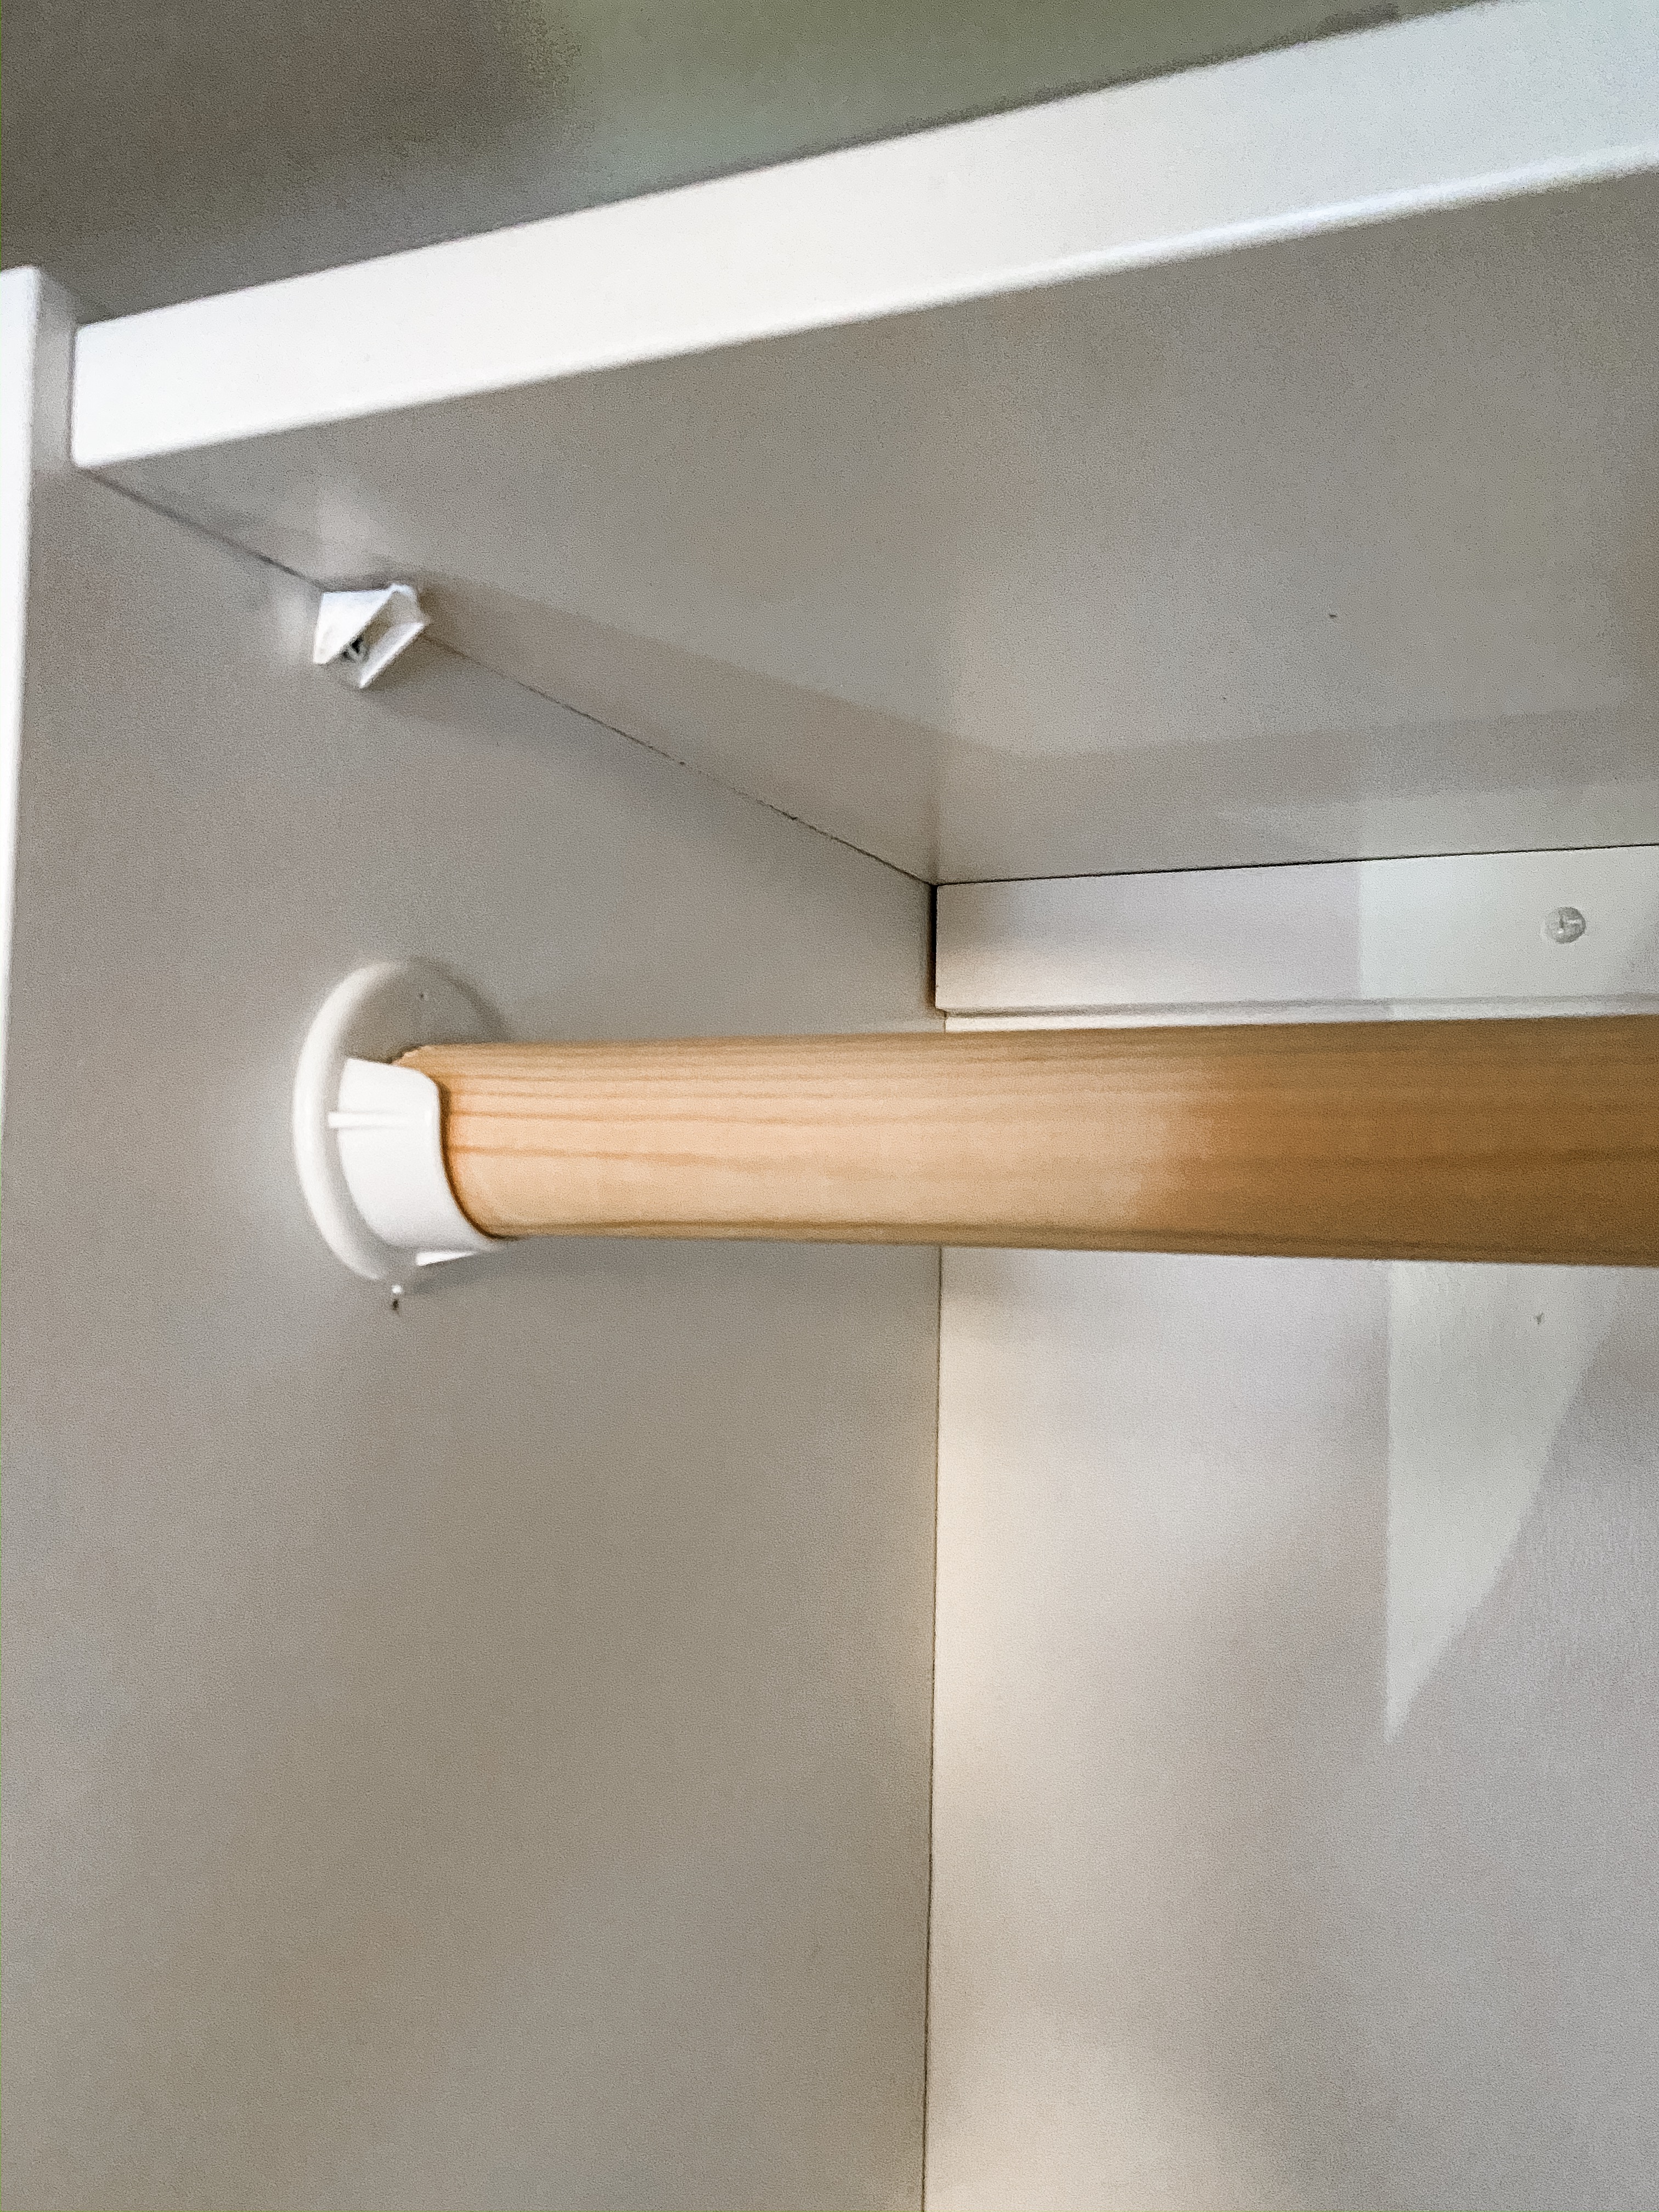
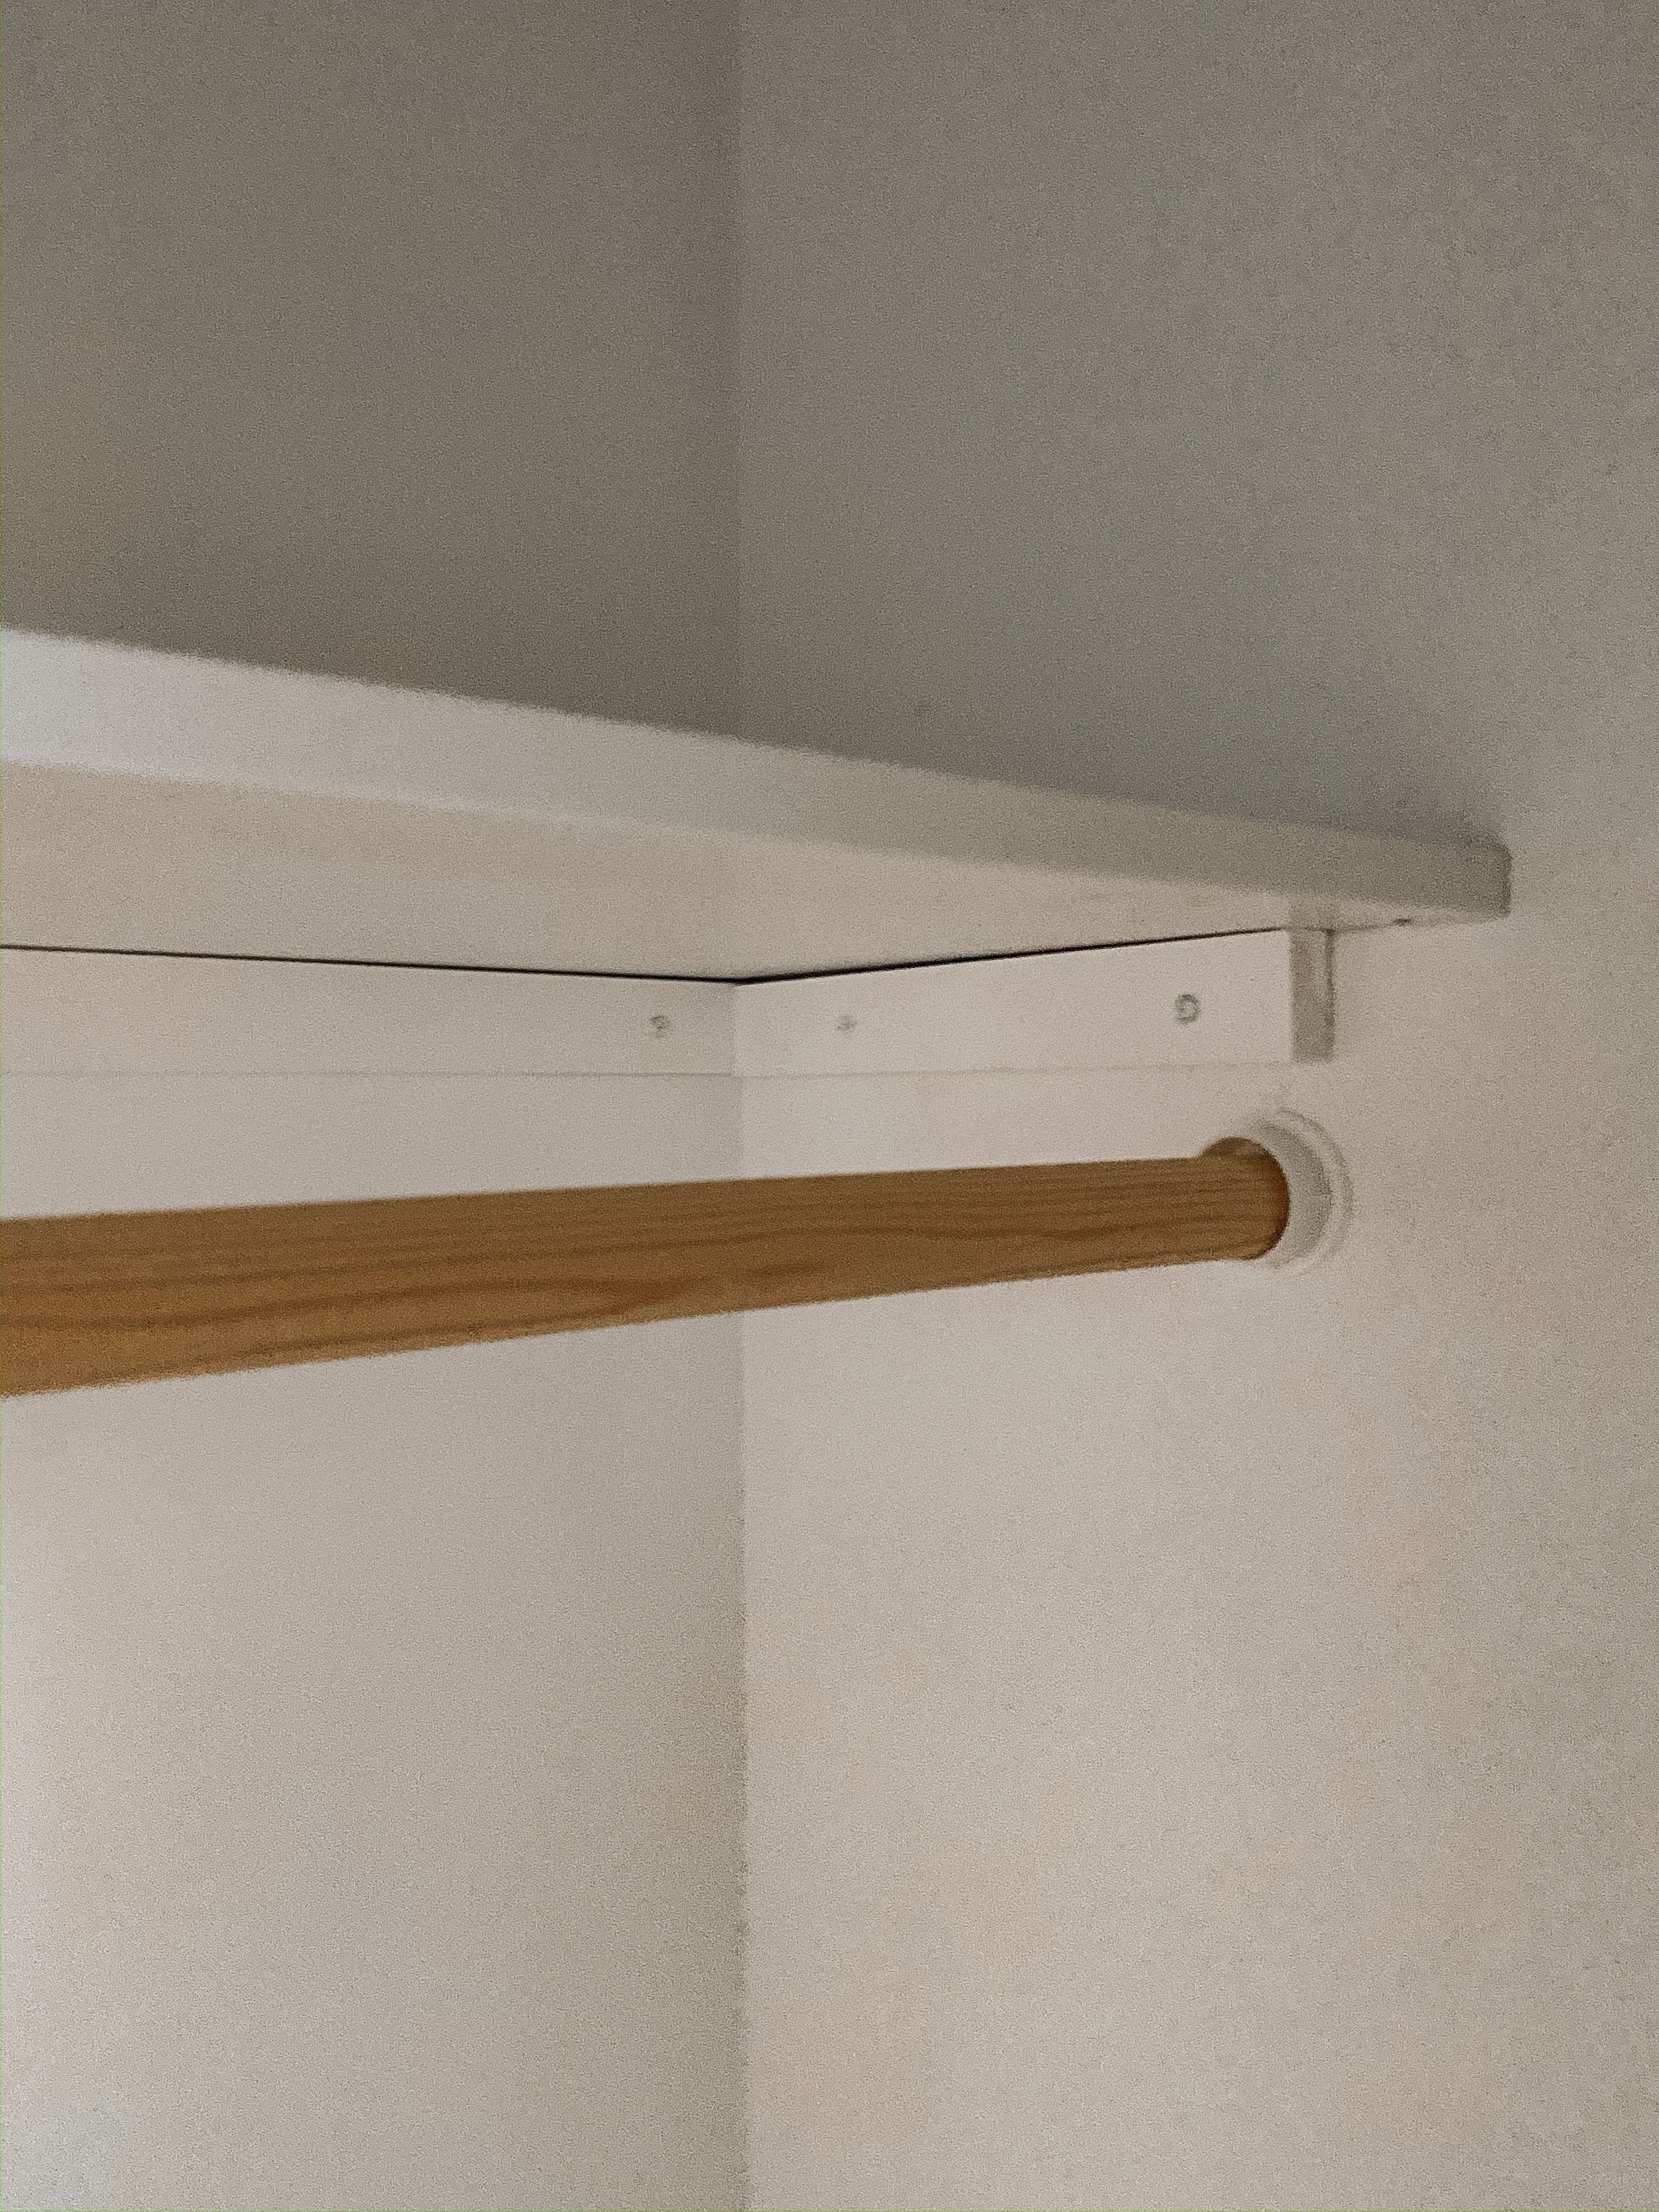
The trickiest part of the whole project was probably installing the shelves and clothing rods on the outside of the wardrobe.
Each shelf was cut to fit. On the wardrobe side, we drilled a hole and used the plastic bracket that comes with the shelf and on the wall side (back and side), we screwed in 1×2’s into studs to support the shelves (and the weight of whatever I wanted to put up there lol). Painted to match the rest of the closet.
For the clothing rods, we kept things simple and budget friendly by sticking with the natural wooden closet rod. We repurposed the one we already had and just purchased a second one. We cut both in half so we had 4 total.


(before caulking 1×2 seams)
The storage baskets are from Target and are a great way to hide winter hats, extra socks, toys, etc. I’ll link them at the end of the post.

We absolutely LOVE how it turned out, and can’t wait to do this in the nursery closet.
Product Links:
11″ White and Leather Decorative Coiled Rope Basket
13″ Round Decorative Basket Natural – Threshold (currently out of stock)
Other basket options from Target:
Decorative Cube Basket with Leather Pull
Round Basket in Braided Matgrass & White Coiled Rope
Basket With Round Handles Large
Stool is from HomeGoods
Other stool options:
Serena and Lily Dipped Stool
Shaker Accent Table or Stool
Prinz Round Children’s Stool

xo Jess


37 Comments
Alyssa Waters
HI! I love your closet so much and looking to do something similar for my daughter. What was the length of this closet? Im trying to determine if my daughter’s 62″ closet would work well for this
Jess
Hi! This closet is 81″ wide by 24″ deep with a 48″ wide opening for the doors. We used the 29″ wide pax system in the middle.. but you could totally opt for one of the smaller ones! I think they have a base unit that is 19″ wide and still has all of the shelves, drawers, and other customizable pax things for that size!
Marie
How wide is your closet? Trying to figure out what size Pax system we should go with.
Melanie
So darling! Did you use wallpaper paste? Or some other adhesive?
Jess
Hi Melanie! Thank you! This wallpaper was pre-pasted, so all I had to do was mist water on the back, fold over for a few minutes and then install like you would on the wall (using a sponge, seam roller, etc)
Jess
Thank you so much for this post with all the links. I saw it on a pintrest board for best closet organizations and couldn’t find any details on where to get the materials so I started scrolling the internet. Couldn’t find anything close to it. I even checked ikea but didn’t think to look at building it separately like you guys did until I read this post that i had to dig through pintrest to find. So happy I did find it! Only thing I am going to do differently is wall paneling instead of wall paper and doing the whole closet in it with black rods. You have such great taste !
Jess
Hi there! Thanks so much 🙂 Your plan sounds great! I’d love to see it with the paneling and black rods.
Pingback:
Pingback:
Isabel
Hiiiii. I’m looking for a wood rod like that. I cannot find one as cheap as you listed. Do you have a link? Or store you got it from?
Isabel
So cute! Where did you get the wooden rods? I cannot find them anywhere for $10 bucks! Can you leave a link?
Jess
Hi! We purchased a 72″ dowel (that was just under $10) from our local home improvement store and then cut it in half – we needed 26″ for each, so we had a little left over. We also only needed to purchase one because we repurposed the clothing rod that was already in the closet. Here is a link to the one we got (or something similar) – https://www.lowes.com/pd/Madison-Mill-1-25-in-dia-x-72-in-L-Round-Poplar-Dowel/1000152147?cm_mmc=shp-_-c-_-prd-_-mlw-_-ggl-_-LIA_MLW_122_Mouldings-Specialty-Millwork-_-1000152147-_-local-_-0-_-0&ds_rl=1286981&gclid=Cj0KCQiAxc6PBhCEARIsAH8Hff1JySyiy_CPHswuJTOp3YJX7Q4E4TZGQ_iG878DfNEDpdR3DL8JvdQaArMyEALw_wcB&gclsrc=aw.ds
Cath
How tall is this base.
Jess
Hi Cath,
This base is 79 1/8 ” tall
Linnea Farnsworth
Hi Jess, I love this so much and want to do something similar for my kids. I have a question- do you have more clothes in those drawers, or is it shoes? I’m just wondering where you keep the girls’ shoes and if we could get by with doing this and getting rid of the kids big dresser. Would free up some nice real estate in their room!
Jess
Hi Linnea! So I added one of these baskets on each side on the floor for them to keep their shoes in. I found with my kiddos, that having a shoe basket was the best way for them to keep things organized. From Target! https://rstyle.me/+Yi5mbZUl94vMlW262K7NnQ
Vanessa
I love this and want to try this for my girls closets! Did you attach the sides to the actual closet walls?
Cat
Hii! What closet rod brackets did you use/how did you attach it to the side of the Pax? I want to make sure the screw doesn’t go through the Pax wall, while also being sturdy. Thank you!
Cat
Hi! What brackets did you use, so the screws did not go through the side of the Pax?
Pingback:
Grace
What shelving did you use to go all the way around the very top (the very top row of shelving)? Was it pax or an existing shelf or a wooden shelf you installed yourself? Thanks!
Jess
Hi! We used one 29″ pax system in the middle (so the middle of that top shelf is the very top of the pax system) then we took 2 pax shelving units the same depth and installed them on either side (we put 1×2 on the back and side walls to help support) we did need to trim about an inch off each shelf so they fit the closet. Hope that helps!
Heather
Do you have a link to the shelf for the top? I’m having a hard time finding it.
Jess
Hi! The top middle shelf is the top of the Pax system itself, and the right and left are the single Pax shelves you can purchase separately (just make sure they are the same depth as the pax system you are installing)
SR13
Love this! We are thinking of doing the same in a 24″ deep closet. Do you think you could do the 22″ deep Pax instead of the 13″? I am wondering if it’s too close to the doors for function.
Tara
I’m wondering about that too
Jess
I suggest measuring it out with painters tape so you get an idea of the footprint. We went with the shallow PAX so that we could more easily access the deep corners on the right/left of the closet. The clearance also allows for us to have a big basket on the floor on either side for shoes.
Pingback:
Heather
I posted a previous comment asking about links for 14” stuff but finally found it all. And it’s all out of stock! Everywhere! Ugh. So we will just diy it. We’ve built a cabinet before so hopefully will go well. We have the same wallpaper from our laundry room remodel so I love how you used yours and plan on doing the same. Thanks for the inspiration!
Jess
Hi Heather!! I’m so sorry I missed your comment! Girl, I know! It’s all out of stock currently and we’ve been waiting to do this in our other daughters closet. IKEA does have the deeper version available it looks like, but our closets are pretty shallow. We are going to go ahead and DIY it too. We did find similar peg board at Home Depot that you could use as the sides for the shelves. Good luck! I’d love to see how yours turns out!
Pingback:
Camilla DaSilva
Hey Jess,
It looks stunning! I’m looking forward to try to apply this idea to our little girl’s closet.
What did you use to install the clothes rod? I’m worried it would go through the pax walls, or damage the closet system.
Is the clothes rail sturdy enough to hold multiple clothes as they grow older?
Thank you
Camilla
Jess
Hi Camilla!
Thanks so much! So, we installed the clothes rod with the white clothes rod bracket that are normally sold with the rods. We just made sure the screws we used on the PAX side were not longer than the width of the side of the pax system if that makes sense. We have a TON of clothes on it, and it’s held up amazing. I am careful when I take things off just in case, but I have been very pleased with it all. Hope this helps!
Lauren
I love this! I’ve been wanting to do the same thing in my kids closets. Our closest has carpet. Do you think it would still work with carpet?
Jess
I don’t see why it wouldn’t work! We did cut the baseboards so we could slide the PAX back to be flush against the drywall (let me know if that doesn’t make sense)
Lauren
Love this idea! What is your trick for cutting the shelves to size? We are a little nervous with them being particle board, etc. thanks!
Jess
Hi! We usually use painters tape on the cut line (cut through the tape) and make sure we use a saw blade thats super sharp!